Chassis Bracing
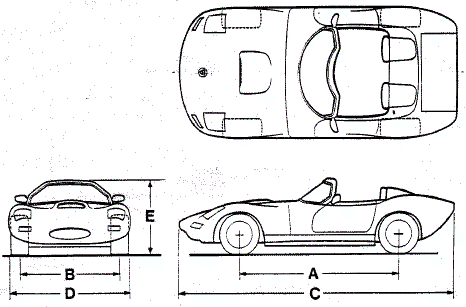
| A | Wheelbase | 2235mm |
| B | Track front/rear | 1382mm/1387mm |
| C | Length | 3832mm |
| D | Width | 1626mm |
| E | Height | 1041mm |
| Weight | 820kg |
Chances are after 13 years of use, combined with some poor original build quality and design your G33 will really feel like a badly built kit car with everything squeaking, rattling and generally feeling loose. Although regular tightening of various nuts and bolts will help, there are many areas that can be improved upon. I have spent some time trying to overcome the weaknesses in the standard G33 design without removing the body tub. The following details the work and results. If you want to do the job properly by removing the body, please see here.
Chassis Mod's Part 1
The front damper/spring mounting point never seemed that well engineered, as the spring mounted directly into the turret, with no rubber to isolate road noise through the spring, and the damper fixing was a simple couple of rubber doughnuts with a nut fixing through the turret. Problem here was the constant vertical movement of the damper shaft and angle change through the top of the turret, was slowing enlarging the hole and making it generally sloppy. Firstly front dampers where modified to now have a “diablo” or loop type fitting at the top. Chassis dynamics (01604 708101) modified the standard Avo dampers for a very reasonable £20 each. The dampers also had an upper spring collet fitted (these just slot on to the new fitting) and new 9” ( 1 “ less than the originals) 275lbs springs fitted, although these required a spring compressor to fit. The front turrets where opened up have two upturned 90’ brackets seam welded in as part of an extra strengthening plate underneath the turret to accommodate the new damper bush. As the damper and spring is now one unit the entire suspension load goes through the new brackets, so it needs to be well engineered. The damper/spring impact is now cushioned through the new polyurethane bush, and the spring compresses uniformly with the new collet fitted. I also added extra strengthening rails to the engine bay part of the chassis to try to increase the torsional strength where I could. These extra rails run from the cross member that runs across the top of the front bulkhead to the front of the chassis by the radiator (see photos). This required the fitting of a smaller header tank and moving the air flow meter, and all the new bracing being welded to the original chassis in preference to bolting. New rubber bushes where then fitted to all the wishbones by the Ginetta factory. When I came to refit the wishbones the new bushes where too long to fit within the mounting points on the chassis. I remember when I first got the car how distorted the bushes had been from new, as they had been forced in to the available space. I decided to trim the excess rubber from each end until they fitted neatly and a rotary sanding disk makes a good job. With a metalastic bush, the central metal tube in the bush should clamp hard between the mounting points, and all the suspension movement then takes place within the rubber of the bush. It should not pivot on the bolt. The suspension has to be left loose(ish) until the full cars weight is on the wishbones, and then the bushes clamped up hard in their now resting position.
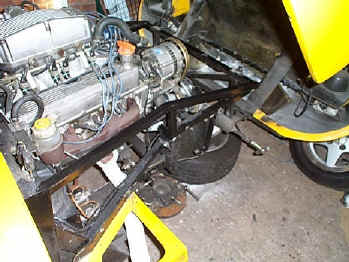
Extra rail on the off side
Extra rail on the nearside, note the altered air sensor and filter position, smaller header tank (Volvo 7 series) and vertical bar joined to the top wishbone rear mounting point.
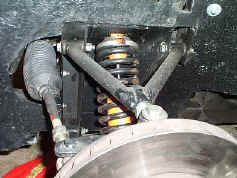
Modified Damper
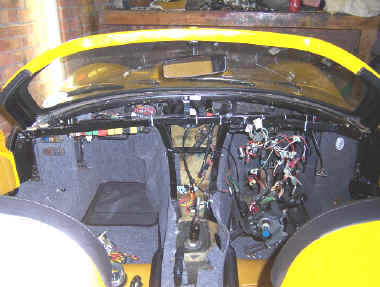
Dashboard
The whole area under the dash is a nightmare. The mini heater box is simply jammed in place and the cables leading to it rattle. My steering column constantly squeaked as the whole front body tub molding flexed. This required a major rethink.
Ford Steering Cowlings
What's that sticking-out plastic bit below the ignition key? Obviously something to rattle your keys against to drive you mad. It can be cut off, and the whole glass fibred over, plus some "plastic" car body filler. I carefully tailored mine so it will fit together nicely and sprayed it crackle black.
Center Console
Ginetta did not bother screwing this into place, and is simply jammed over the transmission tunnel. It becomes quite obvious why this was done, when around 6mm of movement can be seen between the centre console and dashboard as the car scuttle shakes. Any fixings in the glass fibre would simply break.
Seat Mountings and Body Fixings
Unlike Lotus, Ginetta did not use metal bobbins bonded into the body where it bolts to the chassis. Consequently the glass fibre compresses and the fixings become loose. Wherever possible large washers are needed to spread the load on the glass fibre.
Bonnet
The sides of the bonnet are not fixed in anyway, so judder sideways over uneven roads. A simple metal holed plate in the forward sill area and securing pin inserted into the bonnet bracing tube (This needs to be inserted several inches) will prevent this. You can get lots of squeaks as the various bits of the bonnet rub, noticeable by wear marks on the front bulkheads and inner wheel arches. If you cant stop it moving, then grease it to keep it quiet..
Squeaky Suspension
The simple original fixing of the damper through the front turrets can squeak as the metal shaft of the damper rubs against the turret. Also on my car the original metalistic bushes had been fitted very badly, and the wishbones rubbed against their mounting points, metal to metal. If you don't want to replace the bushes, liberal amounts of Waxoyl applied to the chassis will provide some lubrication to keep this quiet. The chassis should be Waxoyled as a matter of course anyway as the original paint is very poor.
Hood Frame
By its nature this will rattle in its enclosure. Some carefully added foam rubber above and below can help hold the whole assembly still. Latter cars had the frame cover (headrests) area bonded permanently to the body, and the hood frame stored in a slot behind the seats. This did help the rattles but made fitting the hood much harder.
Chassis Mod's Part 2
Scuttle Shake
That feeling that the whole chassis is made of rubber over poor road surfaces as the car twists along it's length. This can confuse the feedback you get from the car at speed, and does not help the suspension to do its job as the mounting points move in relation to each other. You may accurately set the suspension up within .5' or 1 mm, only to have it negated by movement in the chassis. It also makes the car feel flimsy.
Trying to reduce scuttle shake is not easy without a major chassis redesign and on close inspection it can be seen why it's so bad. The complete front and rear of the car is only joined buy a relatively shallow floor pan that even though plated, flexes like a shallow baking tray. There is ample room in the transmission tunnel and the sills for additional front to rear tubing to beef things up, but for whatever reason (cost I suspect) this option was not used. The G33 chassis was simply a G27 chassis deign stretched and widened somewhat and suffers accordingly. Looking at the wide sills you would think there are huge box sections front to rear, but they are only thin air and the glass fibre body tub is not a structural part of the chassis. Close inspection of the body tub and transmission tunnel showed very thin glass fibre, so there is no real inherent strength in these mouldings anyway. No doubt some extra glass fibre mat would have helped, but it increases the weight and cost considerably, and trying to use a glass fibre body tub to bolster the chassis seldom works unless designed to do so from the original design. Personally I was not prepared to lift the body off the car and try and redesign the whole lot, so any improvements had to be "bolt on".
ABOVE: A naked G33 Chassis showing a relatively shallow floor plan connecting front and rear leading to scuttle shake problems.
There are several areas that are weak and need reinforcement:
- Front to rear ladder chassis
- Front body tub lateral strength
- Front body tub flex below the windscreen
- Dashboard and center console movement
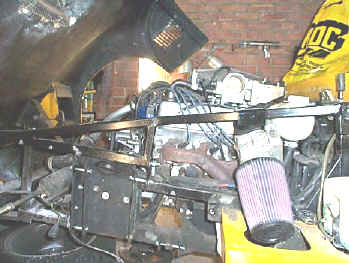
After much head scratching a bolt on master plan was worked out to connect the metal bar that runs along the back of the engine bay with diagonals down to the centre chassis rails as far back as possible. As you need to be able to get in and out of the car, so these have to run down and through the transmission tunnel. it's not quite possible to run straight bars, but using 1" thick wall tubing, with a a couple of welded slight dog legs they will just clear the prop shaft and gearbox on their trip rearwards and downwards. These will reach to about 9" of the rear of the floor pan. This gives much less scope for the chassis to "arch it's back" but it's not ideal to totally reduce the twisting motion along the chassis axis.
A L-shaped bracket was welded between the central chassis rails at the back to bolt the main diagonals to. This was spot welded only, as it will need removing to get the gearbox out. and the main diagonals have to be bolted to allow the removal of the body tub or gearbox.
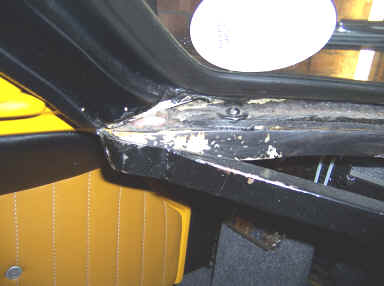
With the two rails in place you now have a really rigid point of reinforcement under the front body tub, dashboard and centre console. The two diagonal rails were joined with a bolt on heavy steel bar, and 1" thin wall tubing welded in various bits to join to the original Ginetta cross member that runs under the dash. Extra diagonals are taken outwards to the edges of the dash. These form two triangular sections with the bars Ginetta had already used to brace the body tub side to side. The whole area around the body tub front of the doors and wind screen is pretty weak vertically, and ideally diagonals are needed downwards, but not possible if you want to get your knees under the dash.
These additions meant the mini heater box would no longer fit, but it's no loss. The heater matrix was removed, a large computer fan bolted directly to it, to waft warm air into the foot well. It JUST fit's between the rails. The demister vents where no longer used, as they are always been worse than useless without fresh air anyway. The mini heater control was thrown away, and the hole in front of the dash glass fibred in. The heater control hot /cold is now a choke cable assembly that fits conveniently into the side of the Ford steering cover, where the Ford choke would have been.
The whole dash had to be moved 5mm or so backwards to a allow for the extra metal work. A thick piece of anti-draught foam was added to the front of the dashboard to take up the extra space. This allows a really neat fit under the windscreen once the dash was re-covered. The dash moulding also had to be cut and remoulded slightly to clear the left horizontal diagonal. The dash also had to be rearranged to clear the right hand one. An aluminium plate was laminated into the centre of the dash to allow it to be bolted to the top of the centre console. The centre console can now be screwed to the transmission tunnel and the dashboard with no risk of anything moving or breaking as everything is linked with the steel tube.
ABOVE: Overall picture of all the extra metalwork. The eagle-eyed amongst you will note it's far from square. Unfortunately having joined my metalwork to Ginetta’s original cross member I found it dropped by 1" across the car, and had spacers fitted to allow it to bolt to the windscreen reinforcing bar. I should have checked it was level before I welded to it! Although hardly visible here there is an extra weld onto the steering column support to the new cross member. This helps stop the steering column from moving around so much.
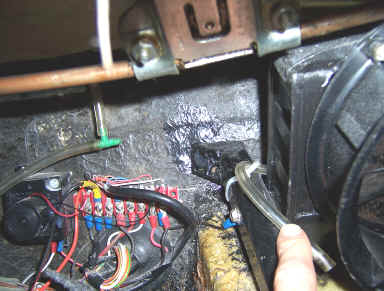
ABOVE: Front bulkhead/engine bay crossbar mounting point from under the dash. A large hole needs cutting in the glass fibre and a spacer inserted. You want metal to metal contact, not a glass fibre sandwich. A M10 bolt was welded in, and then a nut can be tightened against the engine bay cross member. Object on the right is Mini heater rad', plus computer fan for heating.
ABOVE: Right hand dash diagonal. The dashboard fixing point had to be extended back with 1" X 1/8 " Steel bar to allow the dash to still fit. Rev counter and speedo position swapped to clear the new metal work.
ABOVE: Left hand dash diagonal and extension plate
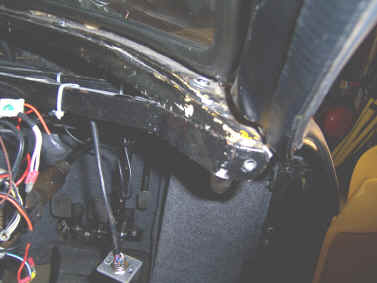
ABOVE: Extra brace from Ginetta cross member to below windscreen. Should have been done in the first place.

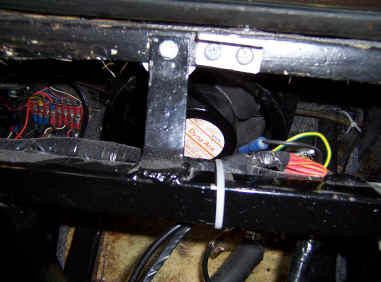
ABOVE: This shows the angle the bars runs from the engine bulkhead back to the rear of the floor pan/chassis. Note the bolts and thick crossbar between the the two bars. The fixing point is on the inside so the bars can be removed without taking the whole cross bar assembly and wiring out. Nuts are welded to both sides of the bars so nothing can chatter or elongate the holes.
ABOVE: Dashboard modifications. Instruments centralised, heater controls removed and aluminum plate added to bolt to center console. The right hand side was cut out and re-laminated on clear new metal work.
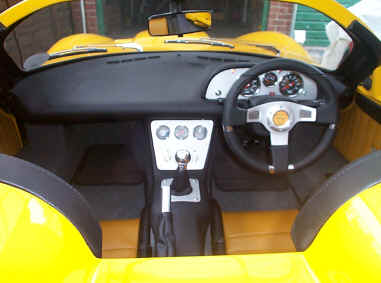
ABOVE: A re-covered dash and new interior, and none of the ironwork visible. Everything totally rock solid now.
Results
Silence is golden, and not a squeak or rattle from anywhere. This must be a first for a G33. I think I’ll have it stuffed. Gone is the the constant shuddering of the dash, console and body tub. The constant "chatter" between the windscreen and top of the mirror mountings is greatly reduced. The car feels really tight now, and although it's not possible to determine if the handling has actually improved, the feedback from a "tighter" chassis is much more confidence inspiring. I did notice however that the doors will still not shut if one front wheel is on the pavement, so the chassis still twists, but it's a big improvement without major re engineering the chassis. It took around 6 months of tinkering over the winter months but has been well worth it.
Chassis Mods Part 4
Like the front dampers, the rear simply have a shaft projecting up to the chassis, retained with washers and rubber donuts. This can lead to some metal-to-metal contact between the shaft and hole in the chassis that can make some noise. I went to a large amount of effort to modify the mountings to give better noise isolation and more accurate location, but having done this it turned out a lot of the squeaking was due to the light fit of the metalastic suspension bushes ( the rubber at each end of the bush) between the wishbones and chassis brackets. To prevent this the bushes have to be cut down slightly or use a rubber lubricant at each end of the bush. The metal tube in the centre of the bush is clamped in the bracket, so does not move, and the noise is generated by the rubber "mushroom" at each end of the wishbone tube moving against the fixed metal bracket.
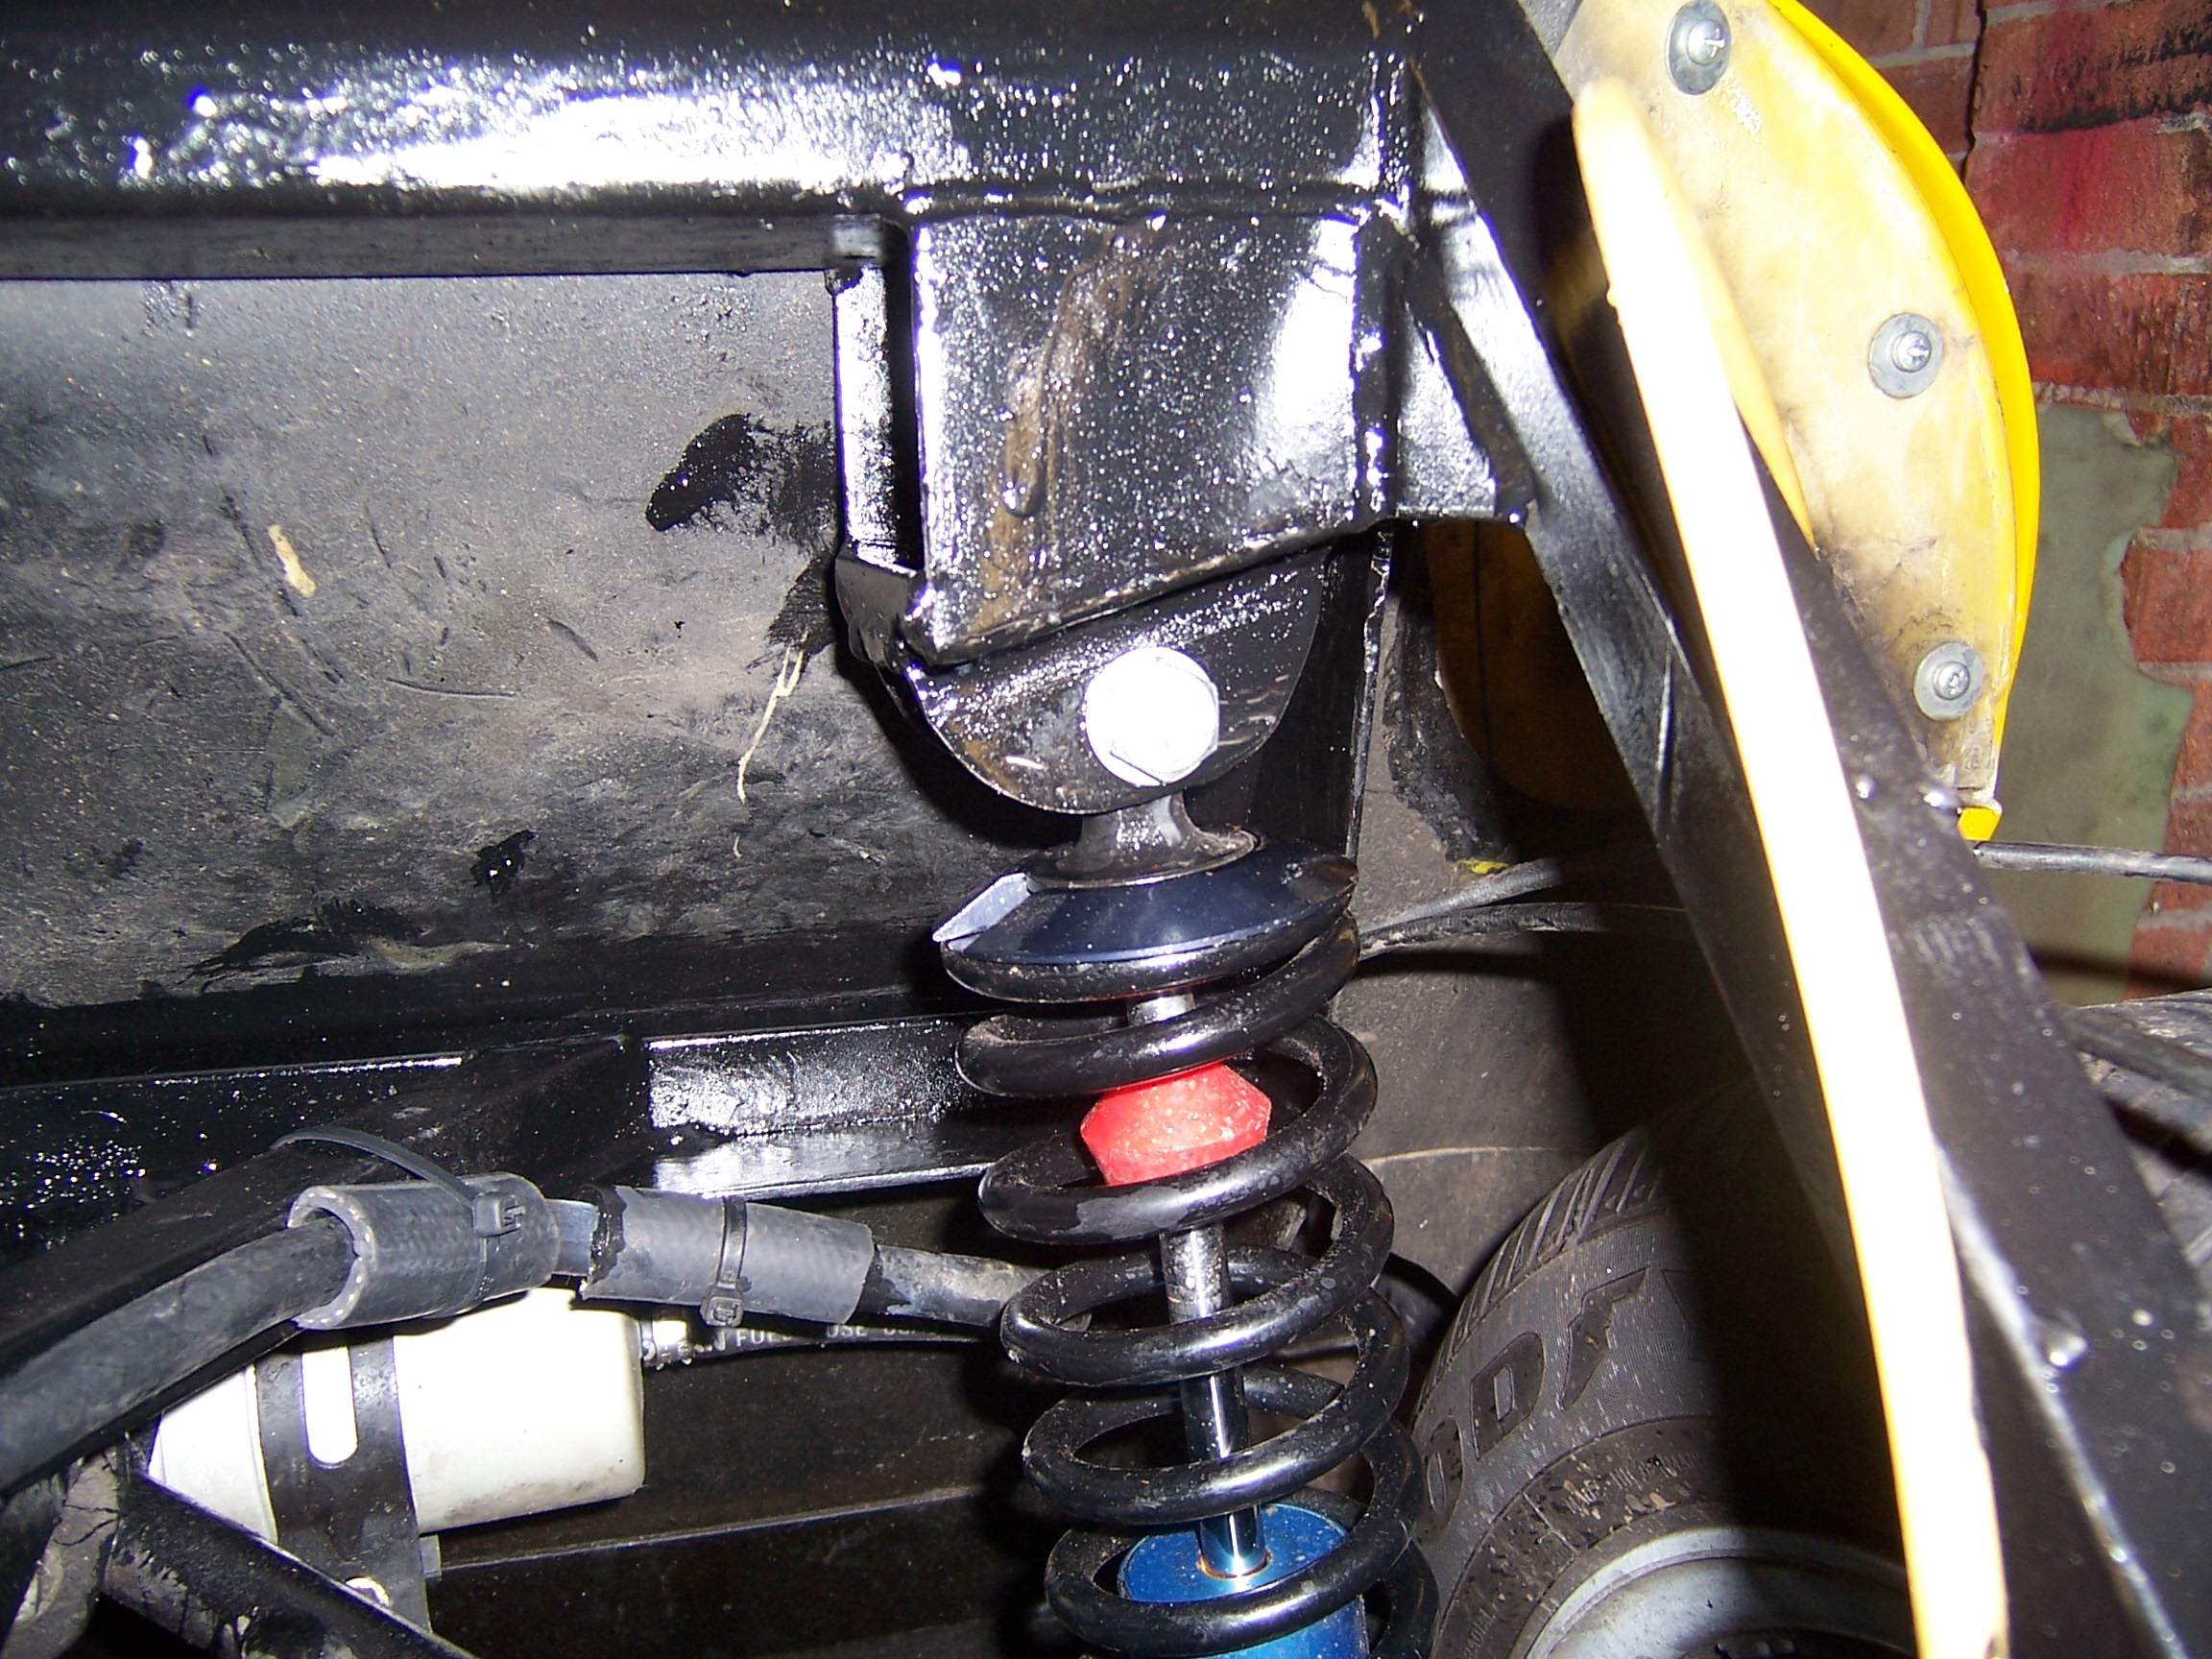
New rear damper mounts. Nice idea but not really worth the effort!
Update 2010
Here are the results of Graham Beales efforts to brace the chassis. The addition of the transmition tunnel bracing should greatly improve the torsional strength front to rear, as used by the likes of Lotus and TVR. Its a great pity Ginetta did not do this in the first place.
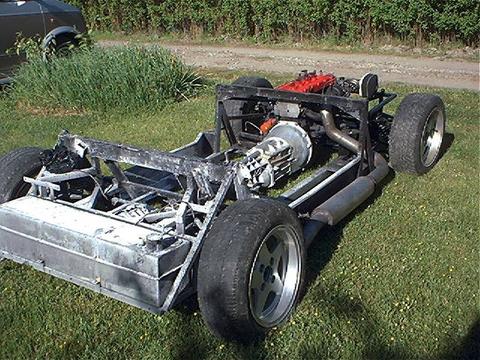
This chassis, that had suffered a fire shows just how little there is between the front and back of the car.

Work in progress: the new tunnel bracing.
And finally Aerodynamics
Although a fine body shape the cars have always had a slight tendency to feel “floaty” at speed, and was noted in the early road tests. Some owners on the other hand have said their cars are fully stable right up to 150mph. Rather you than me is all I can say. Mine has now improved a little by fitting a small pair of splitters (like on the Lotus Elan ) on each side of the radiator air intake. You are quite limited to what you can fit due to the pivot point on the bonnet causes the nose to get very close to the ground when the bonnet is lifted, but this has helped keep nose pointing in the right direction at speed. It does spoil the lines slightly, but is much better to drive at speed.
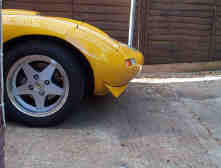
In an attempt to stop the front becoming light a speed, 2 small splitters are fitted . The position was a compromise to try and deflect the air pressure before it got to far under the nose. Larger ones had been tried, but looked out of place and not helped by the curvature of the nose cone not being even on each side. To keep things looking even the splitters had to be of slightly different sizes. The fixing are spring mounted bolts to allow movement against anything solid!